Wednesday, October 9, 2024

Speedreader's Digest: Hashing Data on Linux using AF_ALG

(I seem to have written this in the tone of an advertisment for household cleaning products. Sorry.)

Do you need to quickly hash (e.g. SHA-1) content on Linux? Want to avoid linking against bloated crypto libraries? There's no need to roll your own; use the Linux kernel's AF_ALG functionality! It's fast, supports many hash algorithms, and plumbs easily into existing network or disk I/O pipelines.

Look at these benchmark results, comparing io_uring kdigest and openssl performance:


kdigest

FILE SIZE 512 bytes 4096 65536 1M 16M 32M
md5 0.0010984
+-1.44%
0.0008265
+-2.65%
0.0009556
+-1.52%
0.0024098
+-0.35%
0.0266533
+-0.06%
0.0521402
+-0.19%
sha1 0.0011012
+-1.59%
0.0009430
+-2.21%
0.0009173
+-1.89%
0.0019097
+-1.29%
0.0186466
+-0.18%
0.0361400
+-0.13%
sha224 0.0010983
+-1.29%
0.0010970
+-1.72%
0.0010350
+-1.32%
0.0036209
+-0.42%
0.0425834
+-0.06%
0.0841893
+-0.06%
sha256 0.0010996
+-1.34%
0.0011159
+-1.74%
0.0010299
+-1.09%
0.0036085
+-0.40%
0.0426466
+-0.12%
0.0840805
+-0.03%
sha384 0.0011094
+-1.58%
0.0011204
+-1.48%
0.0009555
+-2.96%
0.0027775
+-0.58%
0.0296736
+-0.27%
0.058271
+-0.27%
sha512 0.0010909
+-1.71%
0.0010763
+-3.21%
0.0009746
+-1.77%
0.0027719
+-0.74%
0.0297744
+-0.26%
0.058239
+-0.25%


openssl 3.1.4-3.2

FILE SIZE 512 bytes 4096 65536 1M 16M 32M
md5 0.0039263
+-0.81%
0.0029834
+-1.69%
0.0030833
+-1.28%
0.0044167
+-0.87%
0.0286969
+-0.20%
0.0536009
+-0.16%
sha1 0.0039302
+-1.16%
0.0029809
+-1.62%
0.0030169
+-0.99%
0.0040051
+-1.04%
0.0220672
+-0.29%
0.0414711
+-0.19%
sha224 0.0039211
+-0.99%
0.0039417
+-0.95%
0.0031360
+-1.43%
0.0055392
+-0.69%
0.0408525
+-0.18%
0.078564
+-0.20%
sha256 0.0039277
+-0.60%
0.0039653
+-0.97%
0.0031659
+-1.26%
0.0055284
+-0.76%
0.0408774
+-0.11%
0.0788206
+-0.10%
sha384 0.0039370
+-1.13%
0.0039494
+-0.87%
0.0030840
+-1.26%
0.0047742
+-0.81%
0.029442
+-0.35%
0.056091
+-0.24%
sha512 0.0039456
+-1.02%
0.0039779
+-1.09%
0.0030739
+-1.26%
0.0047586
+-0.55%
0.0294435
+-0.20%
0.056350
+-0.31%


Benchmark System

    Linux Kernel: openSUSE Tumbleweed 6.11.0-1-default
    CPU: Intel(R) Xeon(R) CPU E3-1260L v5 @ 2.90GHz
    Thread(s) per core:   2
    Core(s) per socket:   4
    Socket(s):            1
    RAM: 64GB


Benchmark Script

for size in $((32 * 1024 * 1024)) $((16 * 1024 * 1024)) $((1024 * 1024)) \
            $((64 * 1024)) $((4 * 1024)) 512; do
    dd if=/dev/urandom of="${size}.data" bs="$size" count=1 || break
    echo "==== hashing file of size $size ===="
    for i in md5 sha1 sha224 sha256 sha384 sha512; do
        # prime cache
        cat "${size}.data" > /dev/null
        perf stat --null -r 5 --table \
             openssl "$i" "${size}.data" \
             >/dev/null 2>openssl.${size}.${i}.perf
        perf stat --null -r 5 --table \
             ~/liburing/examples/kdigest "$i" "${size}.data" \
             >/dev/null 2>kdigest.${size}.${i}.perf
    done
done

Tuesday, November 29, 2022

Btrfs Seed Devices for A/B System Updates

Sunflower seedling - Creative Commons Attribution-Share Alike 3.0 Unported
A/B system updates, as described here, provide a way for an operating system (OS) to seamlessly update from an old version to a new version, while ensuring that any failure in the upgrade process will allow for fallback to the known-working old version of the OS.

Typically A/B updates are implemented using separate old and new filesystem images, atop separate, equally sized disk partitions. However, modern copy-on-write filesystems offer some more performant and space efficient possibilities, as described below.

A/B Updates Using Btrfs Subvolume Snapshots

Linux's Btrfs filesystem provides support for snapshots at a subvolume level, which can be used for A/B system updates. A typical procedure would be:

  • The current OS version is running atop an old read-only subvolume
  • When an update is available, the old subvolume is cloned as a writeable snapshot under a newly created path within the filesystem
  • The upgrade is written to the new snapshot subvolume path (e.g. via btrfs receive)
  • The new snapshot is configured as the default subvolume, causing it to be mounted on next boot
  • If any issues are encountered during or post update, any default subvolume change is reverted, the old OS version is booted and the new subvolume is subsequently discarded

This procedure works well; it's space efficient, allows for as many old versions to be retained as desired and also doesn't require any specific block device partitioning scheme. Given these benefits, it's unsurprising that SUSE uses a similar approach to provide Transactional Update functionality. However, there are still some minor caveats:

  • Currently Btrfs only provides atomic snapshots for single subvolumes, meaning that the above procedure shouldn't be used if an OS update modifies multiple subvolumes
  • The update procedure must be aware of the new subvolume path to target for I/O
    • An alternative may be to create a read-only snapshot before upgrading in-place, similar to snapper based rollback

A/B Updates Using Btrfs Seed Devices

Btrfs seed devices offer copy-on-write support at a block device level, which also can be used to provide A/B system updates, with fallback between new and old block devices instead of subvolumes.

The following seed device example requires two or more separate block devices (or partitions), with one acting as a read-only seed device and one a read-write "sprout" device.

  • The currently running OS version is backed by an old block device, flagged as a read-only seed via
    btrfstune -S 1 /dev/old_block_dev
  • When an update is available, the new writeable "sprout" device is added to the Btrfs filesystem via
    btrfs device add /dev/new_block_device /
  • The filesystem is remounted read-write
  • The update is written in-place, with Btrfs ensuring that all update I/O is written to the newly added block device
  • The new block device is flagged for the bootloader as the default boot device
  • If any issues are encountered during or post update, any default boot device change is reverted and the new block device can be discarded
    • The previous OS version remains untouched on the old device for fallback
  • Once the new OS version is deemed stable, the old seed device should be removed from the filesystem, which will cause dependent data from the old device to be merged into the new

This seed device approach removes some of the constraints of the Btrfs subvolume approach, namely:

  • The update procedure can atomically apply changes across multiple subvolumes, with seed-device rollback safely reverting all subvolume changes made
  • After read-write remount, the update process can perform I/O to the running system in-place, without any specific knowledge of the seed device usage or underlying filesystem

This functionality may be attractive for Linux distributions, particularly if adding A/B update support to an existing update process with little filesystem integration. However, there remain a number of trade-offs to consider:

  • Seed devices are significantly less space efficient compared to snapshot based A/B updates
    • Each block device must have sufficient capacity to store the OS
  • I/O performed when the old seed device is removed from the updated filesystem is a significant overhead and is avoided with snapshot based A/B updates
    • Btrfs at least provides some compensation for this by verifying data checksums
  • Btrfs seed device support appears somewhat niche compared to regular subvolume snapshots, so it likely receives less filesystem test focus

A/B Updates Using Copy On Write Virtual Block devices

2024-10-10 update: Interestingly, since I wrote this article a couple of years ago, Android has moved from a fully provisioned, partition based A/B approach to now using device-mapper, which provides layered, block level copy-on-write A/B updates.

Conclusions

Btrfs subvolume snapshots and seed devices can both be used to provide seamless and reliable A/B system updates. Snapshot based updates offer more efficient storage and CPU resource utilization, so should likely be considered the optimal choice for implementers.
Seed device based updates are a viable alternative, particularly for multi-subvolume updates, but implementers should carefully consider the described trade-offs.
Animated gif of a sunflower seed sprouting - Creative Commons Attribution-Share Alike 4.0 International

Thanks

 Changelog

  • 2024-10-10: add "A/B Updates Using Copy On Write Virtual Block devices" note
     

Saturday, April 21, 2018

Samsung Android Full Device Backup with TWRP

Warning

Following these instructions, correctly or incorrectly, may leave you with a completely broken or bricked device. Furthermore, flashing your device may void your warranty - Samsung uses eFuses to permanently flag occurrences of a device running non-Samsung software, such as TWRP.
I take no responsibility for what may come of using these instructions.

With the warning out of the way, I will say that I tested this process with the following environment:
  • Android Device: Samsung Galaxy S3 (i9300)
  • TWRP: 3.2.1-0
  • Desktop OS: openSUSE Leap 42.3

Flashing and Booting into Recovery

  • Download the official TWRP image for your device, and corresponding PGP signature
    • https://dl.twrp.me
  • Use gpg to verify your TWRP image
  • Download and install Heimdall on your Linux or Windows PC
  • Boot your Samsung device into Download Mode
    • Simultaneous hold the Volume-down + Home/Bixby + Power buttons
  • Using Heimdall on your desktop, flash the TWRP image to your device's recovery partition:
    • heimdall flash --no-reboot --RECOVERY <recovery.img>
    • Wait for Heimdall to output "RECOVERY upload successful"
  • From Download Mode, boot your Samsung device into TWRP
    • Simultaneous hold the Volume-up + Home/Bixby + Power buttons
    • If you accidentally boot into regular Android, then you'll likely have to boot into Download Mode and reflash, as regular boot restores the recovery partition to its default contents

Exposing the Device as USB Mass Storage

  • Unmount all partitions:
    • From the TWRP main menu, select Mount, then uncheck all partitions
  • Bring up a shell
    • From the TWRP main menu, select Advanced -> Terminal 
    • adb shell could be used instead here, but the adb connection from the desktop to the device will be lost when all USB roles are disabled
  • Determine which block device you wish to backup
  • # cat /etc/fstab
    
    • In my case (i9300), all data is stored on /dev/block/mmcblk0 partitions
  • Check the current state of the TWRP USB gadget
  • # cat /sys/devices/virtual/android_usb/android0/functions
    mtp,adb
    
  • Configure a read-only USB Mass Storage gadget
  • # echo 1 > /sys/devices/virtual/android_usb/android0/f_mass_storage/lun0/ro
    # echo /dev/block/mmcblk0 > /sys/devices/virtual/android_usb/android0/f_mass_storage/lun0/file
    
  • Disable all USB roles
  • # echo 0 > /sys/devices/virtual/android_usb/android0/enable
    
  • Enable the Mass Storage gadget USB role
  • # echo mass_storage,adb > /sys/devices/virtual/android_usb/android0/functions
    # echo 1 > /sys/devices/virtual/android_usb/android0/enable
    
  • If not already done, connect the device to your desktop or laptop
    • The attached device should appear as regular USB storage

Backup

Any Linux, Windows or macOS program capable of fully backing up a USB storage device should be usable from this point. The procedure below uses the dd command on Linux.
  • From your computer, determine which USB storage device to back up
  • ddiss@desktop:~> lsscsi
    ...
    [2:0:0:0]    disk    SAMSUNG  File-Stor Gadget 0001  /dev/sdb 
    
  • As root, start copying the data from the device
  • ddiss@desktop:~> sudo dd if=/dev/sdb of=/home/ddiss/samsung_backup.img bs=1M
    
  • dd will take a long time to complete, depending on the size of your device, USB connection speed, etc.
  • Once completed, unplug your Android device and reboot it
  • The image file can be compressed
With the image now obtained, you could mount it on your desktop, or restore it to the device at a later date. I'll hopefully get around to writing separate posts for both in future.

Monday, January 29, 2018

Building Ceph master with C++17 support on openSUSE Leap 42.3

Ceph now requires C++17 support, which is available with modern compilers such as gcc-7. openSUSE Leap 42.3, my current OS of choice, includes gcc-7. However, it's not used by default.

Using gcc-7 for the Ceph build is a simple matter of:
> sudo zypper in gcc7-c++
> CC=gcc-7 CXX=/usr/bin/g++-7 ./do_cmake.sh ...
> cd build && make -j$(nproc)

Monday, July 3, 2017

Multipath Failover Simulation with QEMU

While working on a Ceph OSD multipath issue, I came across a helpful post from Dan Horák on how to simulate a multipath device under QEMU.


qemu-kvm ... -device virtio-scsi-pci,id=scsi \
  -drive if=none,id=hda,file=<path>,cache=none,format=raw,serial=MPIO \
  -device scsi-hd,drive=hda \
  -drive if=none,id=hdb,file=<path>,cache=none,format=raw,serial=MPIO \
  -device scsi-hd,drive=hdb"
  • <path> should be replaced with a file or device path (the same for each)
  • serial= specifies the SCSI logical unit serial number
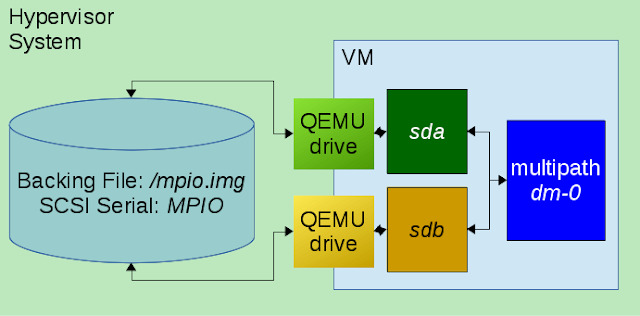
This attaches two virtual SCSI devices to the VM, both of which are backed by the same file and share the same SCSI logical unit identifier.
Once booted, the SCSI devices for each corresponding path appear as sda and sdb, which are then detected as multipath enabled and subsequently mapped as dm-0:

         Starting Device-Mapper Multipath Device Controller...
[  OK  ] Started Device-Mapper Multipath Device Controller.
...
[    1.329668] device-mapper: multipath service-time: version 0.3.0 loaded
...
rapido1:/# multipath -ll
0QEMU_QEMU_HARDDISK_MPIO dm-0 QEMU,QEMU HARDDISK
size=2.0G features='1 retain_attached_hw_handler' hwhandler='0' wp=rw
|-+- policy='service-time 0' prio=1 status=active
| `- 0:0:0:0 sda 8:0  active ready running
`-+- policy='service-time 0' prio=1 status=enabled
  `- 0:0:1:0 sdb 8:16 active ready running

QEMU additionally allows for virtual device hot(un)plug at runtime, which can be done from the QEMU monitor CLI (accessed via ctrl-a c) using the drive_del command. This can be used to trigger a multipath failover event:

rapido1:/# mkfs.xfs /dev/dm-0
meta-data=/dev/dm-0              isize=256    agcount=4, agsize=131072 blks
         =                       sectsz=512   attr=2, projid32bit=1
         =                       crc=0        finobt=0, sparse=0
data     =                       bsize=4096   blocks=524288, imaxpct=25
         =                       sunit=0      swidth=0 blks
naming   =version 2              bsize=4096   ascii-ci=0 ftype=1
log      =internal log           bsize=4096   blocks=2560, version=2
         =                       sectsz=512   sunit=0 blks, lazy-count=1
realtime =none                   extsz=4096   blocks=0, rtextents=0
rapido1:/# mount /dev/dm-0 /mnt/
[   96.846919] XFS (dm-0): Mounting V4 Filesystem
[   96.851383] XFS (dm-0): Ending clean mount

rapido1:/# QEMU 2.6.2 monitor - type 'help' for more information
(qemu) drive_del hda
(qemu) 

rapido1:/# echo io-to-trigger-path-failure > /mnt/failover-trigger
[  190.926579] sd 0:0:0:0: [sda] tag#0 UNKNOWN(0x2003) Result: hostbyte=0x00 driverbyte=0x08
[  190.926588] sd 0:0:0:0: [sda] tag#0 Sense Key : 0x2 [current] 
[  190.926589] sd 0:0:0:0: [sda] tag#0 ASC=0x3a ASCQ=0x0 
[  190.926590] sd 0:0:0:0: [sda] tag#0 CDB: opcode=0x28 28 00 00 00 00 02 00 00 01 00
[  190.926591] blk_update_request: I/O error, dev sda, sector 2
[  190.926597] device-mapper: multipath: Failing path 8:0.

rapido1:/# multipath -ll
0QEMU_QEMU_HARDDISK_MPIO dm-0 QEMU,QEMU HARDDISK
size=2.0G features='1 retain_attached_hw_handler' hwhandler='0' wp=rw
|-+- policy='service-time 0' prio=0 status=enabled
| `- 0:0:0:0 sda 8:0  failed faulty running
`-+- policy='service-time 0' prio=1 status=active
  `- 0:0:1:0 sdb 8:16 active ready  running

The above procedure demonstrates cable-pull simulation while the broken path is used by the mounted dm-0 device. The subsequent I/O failure triggers multipath failover to the remaining good path.

I've added this functionality to Rapido (pull-request) so that multipath failover can be performed in a couple of minutes directly from kernel source. I encourage you to give it a try for yourself!

Friday, June 9, 2017

Rapido: Quick Kernel Testing From Source (Video)

I presented a short talk at the 2017 openSUSE Conference on Linux kernel testing using Rapido.

There were many other interesting talks during the conference, all of which can be viewed on the oSC 2017 media site.
A video of my presentation is embedded below.
Many thanks to the organisers and sponsors for putting on a great event.

Tuesday, December 27, 2016

Adding Reviewed-by and Acked-by Tags with Git

This week's "Git Rocks!" moment came while I was investigating how I could automatically add Reviewed-by, Acked-by, Tested-by, etc. tags to a given commit message.

Git's interpret-trailers command is capable of testing for and manipulating arbitrary Key: Value tags in commit messages.

For example, appending Reviewed-by: MY NAME <my@email.com> to the top commit message is as simple as running:

> GIT_EDITOR='git interpret-trailers --trailer \
 "Reviewed-by: $(git config user.name) <$(git config user.email)>" \
 --in-place' git commit --amend 

Or with the help of a "git rb" alias, via:
> git config alias.rb "interpret-trailers --trailer \
 \"Reviewed-by: $(git config user.name) <$(git config user.email)>\" \
 --in-place"
> GIT_EDITOR="git rb" git commit --amend

The above examples work by replacing the normal git commit editor with a call to git interpret-trailers, which appends the desired tag to the commit message and then exits.

My specific use case is to add Reviewed-by: tags to specific commits during interactive rebase, e.g.:
> git rebase --interactive HEAD~3

This brings up an editor with a list of the top three commits in the current branch. Assuming the aforementioned rb alias has been configured, individual commits will be given a Reviewed-by tag when appended with the following line:

exec GIT_EDITOR="git rb" git commit --amend

As an example, the following will see three commits applied, with the commit message for two of them (d9e994e and 5f8c115) appended with my Reviewed-by tag.

pick d9e994e ctdb: Fix CID 1398179 Argument cannot be negative
exec GIT_EDITOR="git rb" git commit --amend
pick 0fb313c ctdb: Fix CID 1398178 Argument cannot be negative
#    ^^^^^^^ don't add a Reviewed-by tag for this one just yet 
pick 5f8c115 ctdb: Fix CID 1398175 Dereference after null check
exec GIT_EDITOR="git rb" git commit --amend

Bonus: By default, the vim editor includes git rebase --interactive syntax highlighting and key-bindings - if you press K while hovering over a commit hash (e.g. d9e994e from above), vim will call git show <commit-hash>, making reviewing and tagging even faster!


Note taking: Arbitrary notes can also be appended to commits using the same technique. E.g. From the git interactive rebase editor:

pick 12dd8972f6e fix build
x GIT_EDITOR='git interpret-trailers --trailer "TODO-ddiss: squash with prior" --in-place' git commit --amend

Thanks to:
  • Upstream Git developers, especially those who implemented the interpret-trailers functionality.
  • My employer, SUSE.

Update 20190123:
  • Add commit message note taking example